Showing posts with label Craft Projects. Show all posts

Friday, July 11, 2014

Doll Shopping Finds at Tuesday Morning, Antique Stores & More

While out of town this week, I've been keeping busy and having fun visiting all of the local area antique stores, flea markets, Tuesday Morning, and more. 

Tuesday Morning here must have hit the Ai Ball Jointed Doll jackpot. There were six different Ai BJD's here for $29.99 each. I've never seen that many in one store before. I took pictures of each one in the store so I could share which ones they have. They were all so cute, that I couldn't decide which one I liked best. Here are the pictures that I took in the store.

Lupinus is a precious little sleeping girl with closed eyes, a sweet brown bob, a beautiful floral dress, and a cute bear hat. She also comes with her own teddy bear and basket bed with bedding that matches her dress.

Lupinus

Lemon is decked out in bright yellow, green and white. She has long blonde curly hair, green eyes, and even a lemon shaped hat.

Lemon

Leptospermum has wild blond hair, blue and black striped pants, and a matching funny shaped hat with two points.

Leptospermum

Lagrus has straight blond hair and blue eyes. She is wearing a pink and white dress and she has a matching coat and hat with bunny ears.

Lagrus

Aster has beautiful long auburn sausage curls. She wears a green dress adorned with white lace and she comes with her own white teddy bear.

Aster

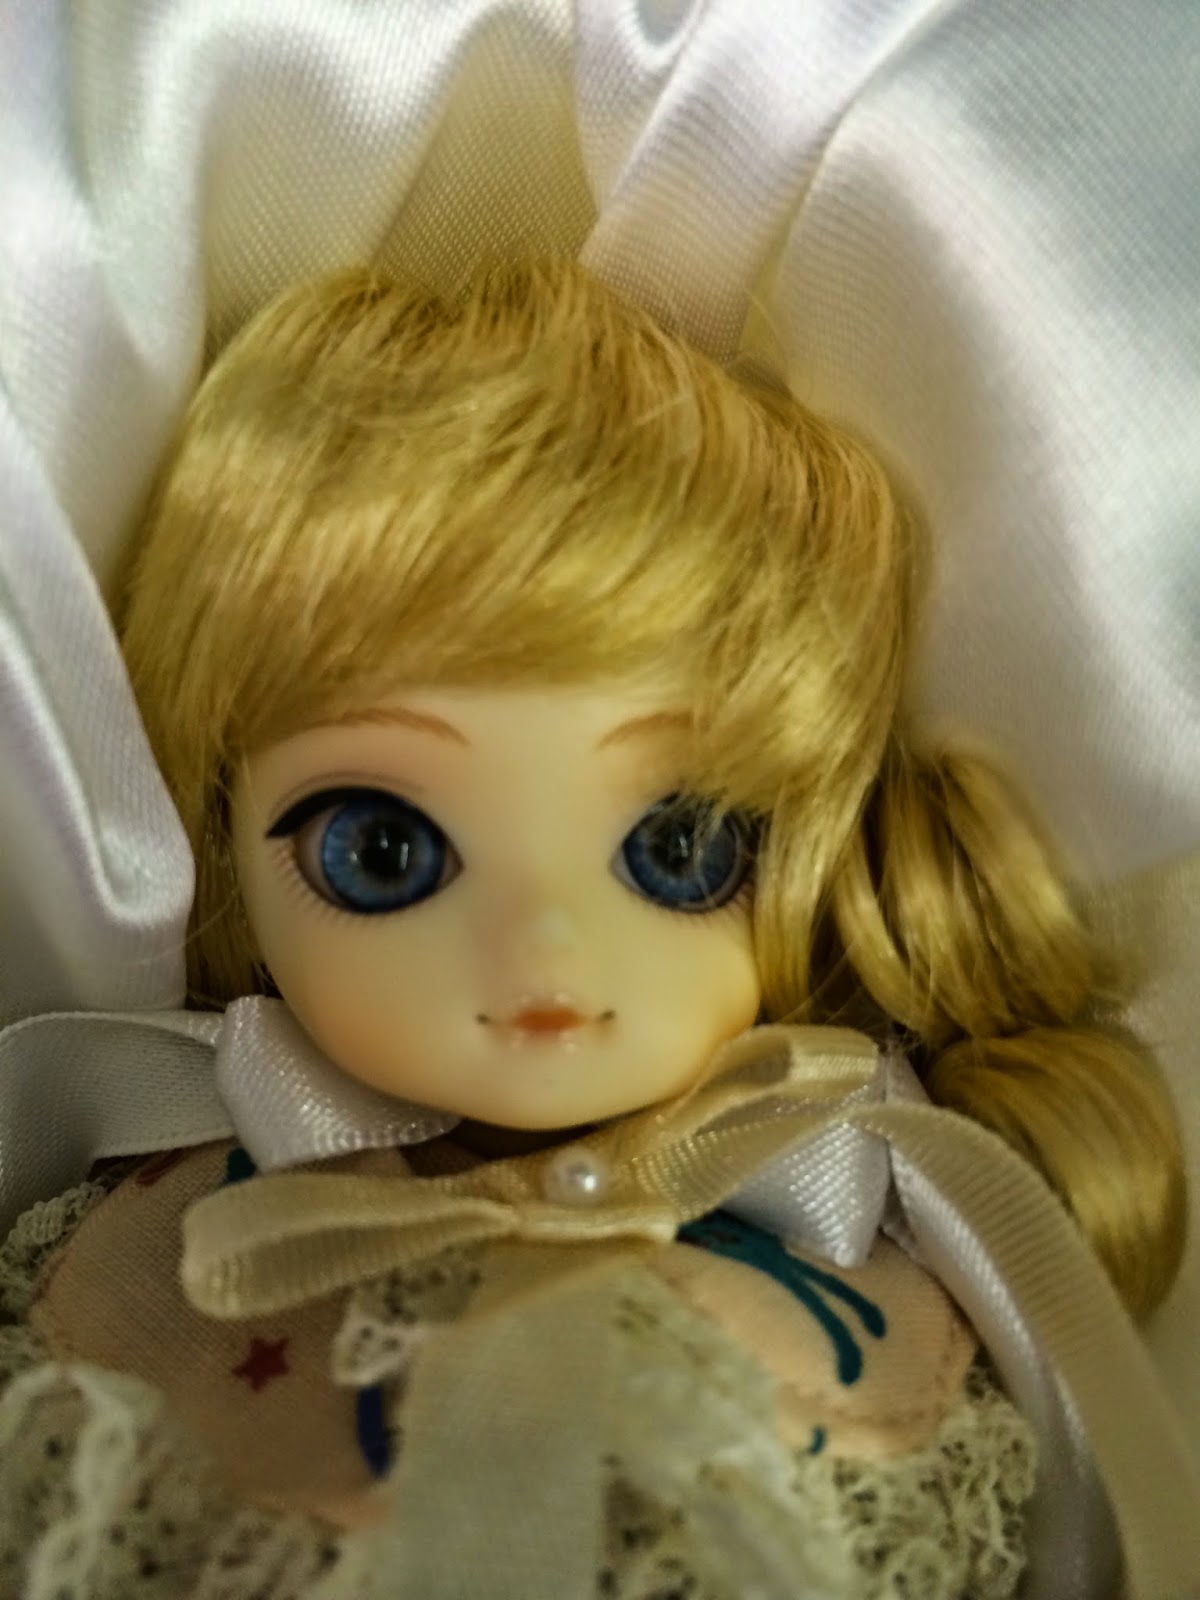
Nerine has blond curly hair and blue eyes. She is wearing a print and polka dot dress adorned with lace. She has a lacy bonnet and her own brown teddy bear.

Nerine

I think Nerine has the prettiest smiling mouth that I have seen on an Ai doll yet. Just look at her sweet happy face.


Tuesday Morning also had two Little Pullip dolls in stock for $9.99 each. They were Silver Ranger and Police Jack.


I searched every nook and cranny of all of the local antique stores. I found this sweet little girl at one of the antique stores. She was so cute that I had to bring her home.


She is a Kathe Kruse doll with her original hang tag. She has a cloth body with a wire armature which makes her posable. She was made in Germany, but I haven't been able to find out exactly how old she is yet. She is wearing her original dress, hat, and tights.


The same antique store had a jar filled with tiny wicker baskets for $6. I love finding miniatures, and there are just so many possibilites with these tiny baskets. There turned out to be 24 baskets in the jar.


I picked up a little classified ad paper at one of the antique stores, and inside, I found an ad for someone selling some old dolls. I called the number, and spoke to a nice lady who was selling her mom's doll collection. Her mom, who was a long time doll collector, passed away last year. I decided to go take a look at her dolls, and I'm happy to share that I purchased my first composition doll from her.


She is an Arranbee (R&B) Nancy doll. From the research I have done, she is from the 1930-1940's. She is 20" tall and she is made completely from composition. She is marked NANCY on her neck.


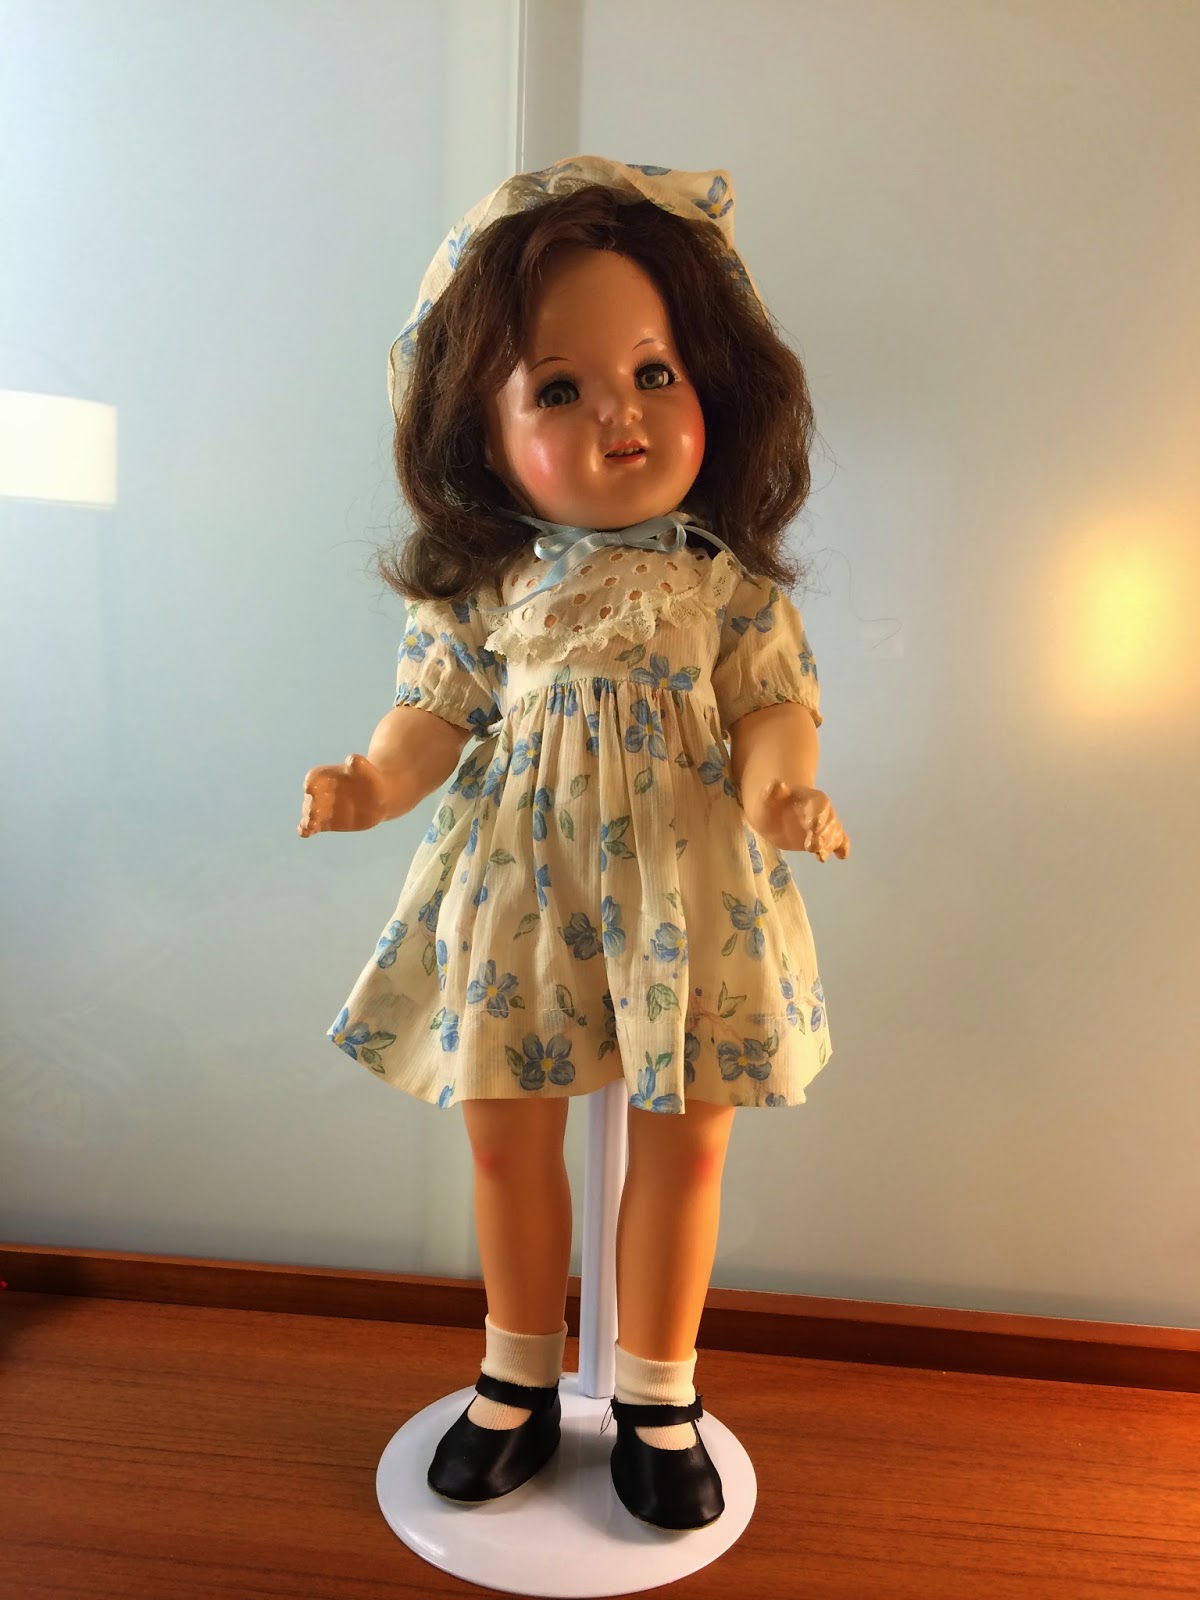
I just fell in love with her open smiling mouth with four teeth. She has sleep eyes and a human hair wig. She appears to be wearing her original dress and bonnet.


I also purchased 41 issues of Antique Doll Collector magazine from  her.


There are various issues from 2004-2011. I'm really excited to get these since I've been wanting to learn more about antique dolls.


I've been looking at antique bisque Kewpie dolls for a while now, even though I don't have one yet. My daughters think they are adorable too. We've been to a lot of antique stores this summer, and a couple weeks ago, my 8 year old said she just wants to find a Kewpie doll. I told her that they were made of bisque and were very fragile though, and she changed the statement to "I just want to find a vinyl Kewpie doll". Guess what the lady also had in her collection... a vinyl Kewpie doll. So I had to buy her for my daughter.


I also bought these little Madame Alexander dolls for my daughters.  Little Red Riding Hood is just adorable.


Hitty Etta came along on the trip with me since she is a travel doll. Here she is by the window in the hotel.


She traveled in my purse wrapped in this adorable little Hitty applique quilt from eBay.


It's been a wonderful trip, and we will be heading home later today. I hope you enjoyed hearing about our adventures.

Have a wonderful weekend!!! 

Friday, May 9, 2014

Miniature Ceiling Fan Tutorial - Dollhouse Part 7

Today I wanted to share with you how to make a miniature ceiling fan.


I used simple objects that are easy to find at the craft store to make this project. You can make the ceiling fan for any size doll, depending on the size parts that you use. Tools you will need are a drill, Easy Cutter (or something to cut a thin wooden dowel), wire cutters, and pliers. Here is a list of the parts that I used, including Hobby Lobby's item numbers.

  1. Craft wood shapes - ovals - item #500082
  2. Craft wood - bowls - item #165431
  3. Craft wood - wheels - item #211045
  4. 3/16" Wooden Dowel 
  5. Jewelry Shoppe Long Headpin - Hearts - item #126722L
  6. Small Knob - I used Tim Holtz Curio Knobs from the scrapbooking dept.
  7. Craft Paints
  8. Toothpicks
  9. Fast Grab Tacky Glue
  10. Locktite Ultra Liquid Control Super Glue

I started by drilling a hole in the end of the 3/16" dowel. I used the tiniest drill bit to drill a hole just big enough so that a toothpick would fit tightly in the hole. You will only need to drill the hole about 1/4" deep.


Cut the end off of a toothpick.


Make sure the cut end of the toothpick will fit tightly into the hole, then take it back out to cut the dowel to size.


Take the screw out of the back of your knob. You won't need the screw for this project.


Place the knob face down on the table, and place the wooden wheel on top. Put the end of the dowel through the hole in the wheel until it touches the knob.  Use a pencil to mark how long the dowel needs to be.


Cut the dowel on your pencil mark.


Use the pliers to hold the tiny piece of dowel while you drill a hole into the other end. You will need a toothpick size hole in both ends of this tiny dowel.


Apply glue to the cut end of your toothpick and twist it into the hole in the dowel.


Measure about how deep the toothpick will go into the screw hole on the back of your knob.


Cut the toothpick off so that the dowel will be flush against the back of the knob with the toothpick in the screw hole.


After making sure that you have the toothpick cut to fit into the knob right, glue it in place. I like to put Fast Grab Tacky Glue on the toothpick and the end of the dowel, and then add a drop of Super Glue on top of the Tacky Glue for a really fast bond. It should look like this with the toothpick completely hidden, glued inside the knob and the dowel.


Place the wheel on the dowel. The wheel is not glued at all, so that it will turn freely on the dowel. The ceiling fan really works. It spins with manual power. :)


Cut the end off of another toothpick, which will fit into the hole in the other end of the dowel.


Drill a hole through the center of the bottom of one of the wooden shape bowls.


Measure how long to cut the toothpick so that it can fit through the hole in the bowl where it will be glued later.


The bowl will be the ceiling mount part of the fan. Don't glue this in place yet though.


Take the wheel back off of the dowel and with a pencil, mark five evenly spaced dots around the edge of the wheel.  Drill a hole at each mark. Use pliers to hold the wheel while you are drilling into it, so that your fingers are not close to the drill bit.


The bag of wooden oval shapes come with three sizes. Choose the right size depending on the size fan that you want to make. The heart shaped head pin will fit on the oval like this, becoming your fan blades.


Holding the heart in place on the oval, bend the wire down around the edge of the wood, then bend it again toward the back where it will fit into the wheel (your fan motor).


Cut the wire to fit into the holes that you drilled around the edge of the wheel, checking to make sure that you cut the length of wire to match the depth of the hole.


Use both the Fast Grab Tacky Glue and the Super Glue to glue the metal pins into the holes in the wheel. The Fast Grab Tacky will give you a strong hold, while the Super Glue will set up fast. Be careful not to get the Super Glue on your fingers. Hold each pin in place for a minute until the glue sets up.


Once all 5 pins are glued in place, set aside to dry completely.


While that is drying, you can paint or stain your fan blades. I used white craft paint.


Once the glue was dry, I painted the wheel, pins, and bowl parts with bronze metallic craft paint.


The bronze paint was brighter than the metal on the knob, so once the paint was dry, I added a dry brushing of dark brown craft paint to make it match the knob. I also dry brushed the blades a tiny bit to give them more of an aged patina. Dry brushing is a great way to create a shabby chic look. Just dip your paint brush in brown paint and brush it on a paper towel until it looks like all the paint is off and the brush is dry.  Then lightly brush the dry paint brush over your project a little area at a time. If it brushes on too dark, you may need to wipe off your brush some more. You can quickly wipe off your project with a wet wipe if it looks too dark. It's kind of like using wood stain, you brush it on and wipe it off until it's just right.


Once the paint is completely dry, you can start gluing your fan blades in place. Using a toothpick apply Fast Grab Tacky Glue to the heart pin.


Put a drop of super glue on the fan blade where the heart pin will go.


Hold the fan blade in place against the heart pin for a minute until the super glue sets up.


Place the motor (wheel) back on the dowel with the hearts facing the knob.  Remember there is no glue on the wheel, so that it will spin freely. Glue the cut toothpick into the hole in the end of the dowel and glue the other end of the toothpick into the hole in the bowl. The bottom of the bowl will be glued to the dowel, but not to the wheel.


Here's the finished ceiling fan. My girls love giving the blades a tap to watch the fan spin fast.


I'd love to hear from you if you make your dolls a ceiling fan! And if you have any questions about this project, please don't hesitate to ask.

Have a wonderful weekend!

Hugs,
Lisa